How to Invite Users to your App Store Connect Account

This article provides steps on how to invite a new user to your Apple Developer account. Please note that inviting a new user is only available for Apple Developer accounts of the company/organisation type. 


  1. Login to App Store Connect.
  2. Open the Users and Access section.
  3. Click the '+' button in the top-left corner of the page.
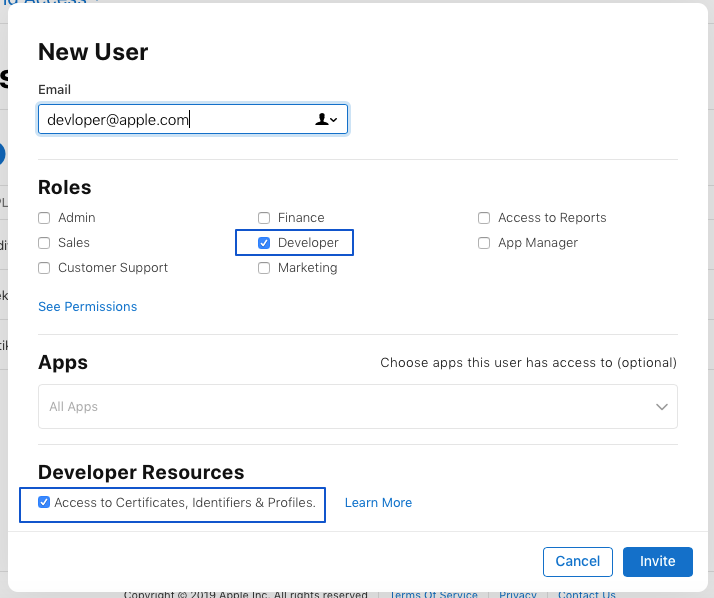
  4. Enter the new users details.
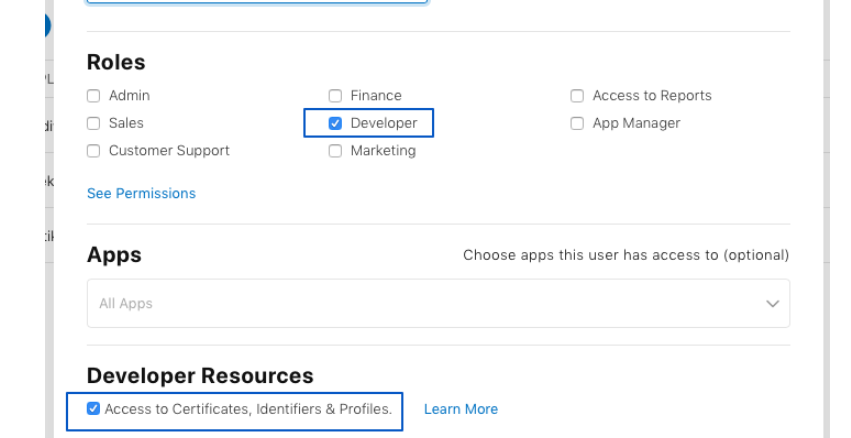
  5. Under Roles, check the box for “Developer
  6. Enable 'Access to Certificates, Identifiers & Profiles'.
  7. Click on invite button


Individual Personal Business Type Account :

You can't add new user into your apple developer account.


How to change Apple Developer User role:

  1. Login to App Store Connect.
  2. Open the Users and Access section.
  3. Click on 'All' menu from under the user menu list.
  4. Click on email id which you want to change role
  5. Under Roles, check the box for “Developer
  6. Enable 'Access to Certificates, Identifiers & Profiles'.
  7. then on Save the changes


Installing the Requirements

As our EasySocial app is build in ionic 3 therefore we require some following thing to install in our system.

 1. Install the node v8.9.0 on your system. 

 2. To install NPM version 5.10.0,  run below command 

sudo npm install This email address is being protected from spambots. You need JavaScript enabled to view it..0 -g --force 

 3. Install Ionic v3.20.0  on your machine with this command 

sudo npm install -g This email address is being protected from spambots. You need JavaScript enabled to view it..0 

4. Install Cordova v7.1.0 on your machine using below command 

sudo npm install -g cordova@7.1.0 

5. Java Package download from here. 

6. Android SDK :

- Download Android SDK from here.

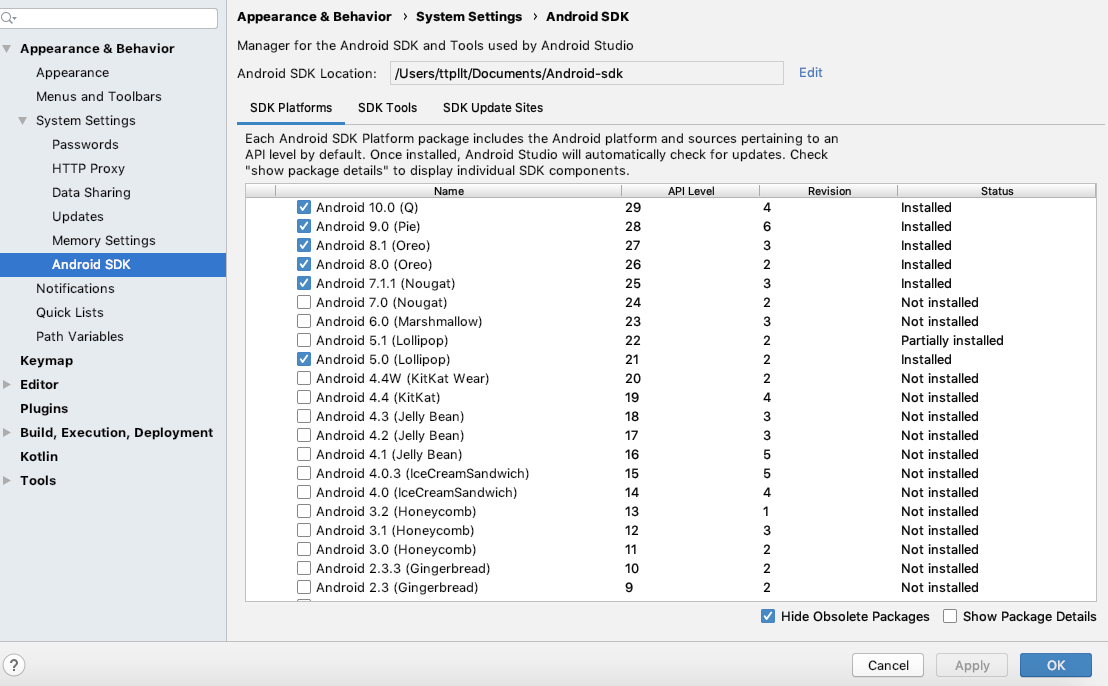
After installing the Android SDK, you must also install the packages for whatever API level you wish to target. It is recommended that you install the highest SDK version that your version of cordova-android support.

Open the Android Studio and make sure the following are installed:

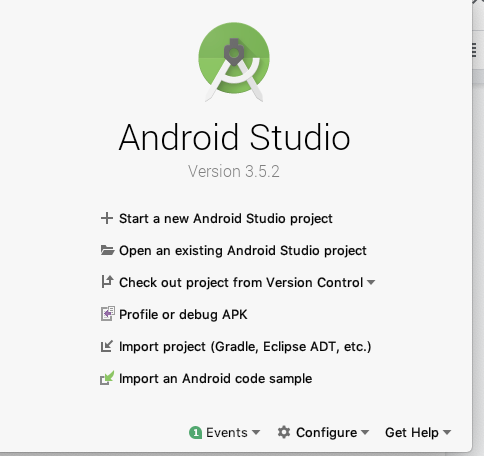
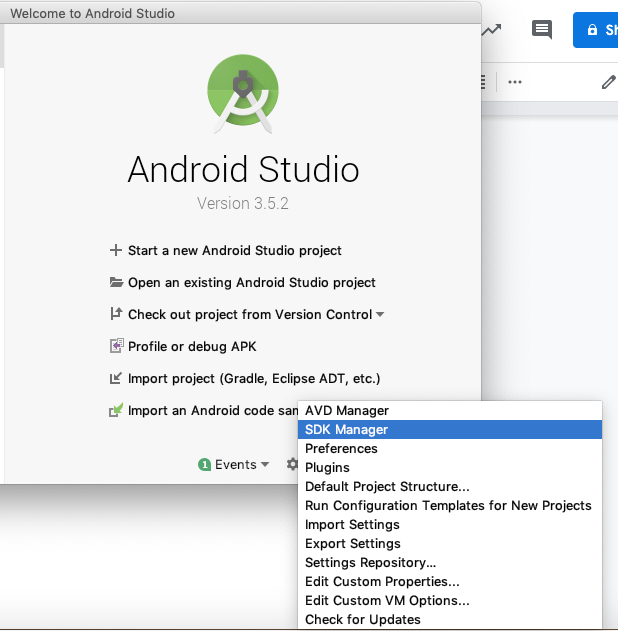
Path : Open Android Studio -> Configure -> SDK Manager.

1. Click on “Configure”:
  

1. Select  “SDK Manager”:
3. Android Platform SDK for your targeted version of Android (eg - target version 28 and latest versions)
4. Android SDK build-tools

 5. Android Support Repository (found under "Extras")

- Google Play Service

- Google Play Licensing Library


Setting environment variables


  • Java path set up

    Modify the ~/.bash_profile file. To set an environment variable, add a line that uses export like so (substitute the path with your local installation):

    export JAVA_HOME=$(/usr/libexec/java_home) 
  • Android SDK environment setup:

    - Linux

    On a Mac or Linux, you can use a text editor to create or modify the ~/.bash_profile file. To set an environment variable, add a line that uses export like so (substitute the path with your local installation):

    export ANDROID_HOME=/Users/Documents/Android-sdk
    
    export PATH=${PATH}:$ANDROID_HOME/tools:$ANDROID_HOME/platform-tools
     

    - Windows: 

    These steps may vary depending on your installed version of Windows. Close and

    reopen any command prompt windows after making changes to see them reflected.

    1. Click on the Start menu in the lower-left corner of the desktop

    In the search bar, search for Environment Variables and select Edit the

    1. System Environment Variables from the options that appear
    2. In the window that appears, click the Environment Variables button
    To create a new environment variable:
    1. Click New... and enter the variable name and value
    To set your PATH:
    1. Select the PATH variable and press Edit.
    2. Add entries for the relevant locations to the PATH.
      C:\YOUR_SDK_PATH_TO\android-sdk\platform-tools;C:\YOUR_SDK_PATH_TO\android-sdk\tools
       

Run Ionic Project on your System


  1. Download EasySocial app source code from here
  2. Extract the downloaded .zip file 
  3. Go to the extracted folder
  4. To add Android platfrom run below command
sudo ionic cordova platform add android@7.1.0 

5. And for add iOS platform run below command

sudo ionic cordova platform add ios@5.0.0 

6. Run below command:

sudo npm install 

NPM install will install all modules listed as dependencies in package-lock.json

7. Run this command:

ionic cordova build android 
  • To generate App icon and splash screen, run below command
sudo ionic cordova resources  


  • To get Project environment information, run below command:
    sudo ionic info 
  •  To debug App: 

           Google Chrome - chrome://inspect

  • IDE Used:   

Visual Studio code 

  • Important Links:

You should check this link for better understanding about the app.

1. How to customiza App - refer link

2. Required icon and splash dimensions : link

3. For Push Notification Implementation (Only for EasySocial) - Link

4. Android and iOS notification settings(Only for EasySocial) - Link

5. To generate multiple device size App icon and splsah screen you need to signup on ionic account - link

6. Ionic framework - http://ionicframework.com/docs/


Steps for the Google Login

Steps for the Google Login

To create a client ID, Please follow these steps:

  1. Go to the Google API Console
  2. From the project drop-down, select an existing project, or create a new one by selecting Create a new project.
  3. In the sidebar under "APIs & Services", select Credentials, then select the OAuth consent screen tab. - Choose an Email Address, specify a Product Name, and press Save.
  4. In the Credentials tab, select the Create credentials drop-down list, and choose OAuth client ID.
  5. Under Application type, select Web application.
  6. Press the Create button.
  7. Please share your generated client ID id with us.

Guidelines for Image Dimensions

When creating a build for an app, you will be asked to upload icon and splash screen. The following are the image dimensions and formats for the same.

  • App Icon Dimension :    1024 x 1024 pixels Format : PNG

    Every app needs a beautiful, memorable app icon that attracts people in the App Store and stands out on their Home screen. This is required for displaying the icon on your mobile phones as well as publishing the app on app store & google play store.

    app icon image
  • Splash Screen Dimension :  2732 x 2732 pixels Format : PNG where the logo or other important artwork is placed within the centre 1200x1200 px

    A splash screen is a graphical control element consisting of the window containing an image, a logo and the current version of the software used to capture the user's attention for a short time.As a promotion or lead-in to the site home page or to tell the user what kind of browser and other software they need to view the site.

    Splash srceen image
  • Background image :    2208 x 2208 pixels Format : PNG where the logo or other important artwork is placed within the centre 1000x1000 px

    This Image is set to the login and registration page in the background. By setting this Image, App looks very impressive.

    Botton color image

Using AC Builder

In this tutorial, you can learn how to use our AC Builder tool to make the customisations to your app. App name, icon, splash screen and colours are some of the attributes that can be customised. Requesting a build involves filling up the app details and then customising the CSS variables to specify colours of your choice. At the end of the process, you will be able to download a zip file that contains all the information about the customisation.

A video tutorial and the text instructions follow - App Details Form Below are the fields from the add details form, and what each of the field means.

App Name : This is the name of the app that your users see. The name is visible in the iTunes Store and Google Play. Before deciding on a name, we suggest that you search iTunes and Google Play to ensure a similar named app does not exist.

Site: This is the site to which your app will connect. In the demo app, users need to type in the site URL. However your customised build will have the site name embedded into the app, so that your users can directly sign in. You can add multiple sites in case you have multiple subscriptions. When requesting a build, choose a single site to create the build for. When creating the site, you will also put your Firebase Cloud Messaging (FCM) sender id here. This is required to add push notifications for your app. Learn more about FCM Configurations for Push Notifications

Bundle ID : The Bundle ID is a unique identifier to identify your app in iTunes store and Google Play. It is also used in the URLs for iTunes and Google Play. The bundle ID follows a reverse domain name format, eg: com.appcarvers.easysocial. Choose the bundle ID carefully, since once your app is live on the site it cannot be changed.

Splash Screen: This is a graphic that is shown full-screen when the app starts. Guidelines for Image Dimensions

App Icon: This is the image that shows up as the icon when an app is installed. This image is also displayed on the listing on iTunes and Google Play. Guidelines for Image Dimensions.

Customising : Customising the CSS and Language Once you save the form above, you can click the customization link next to the build to view the customization files. This page contains 3 sections on the left. The CSS, configuration and language files are different for each app. Refer the respective app customisation pages to see the possible customisation.

CSS Files Edit: The CSS files to change the colours of key elements like navbars, buttons and links. Different apps allow different elements to be customised. The CSS files have comments to help you understand what each variable will change.

JavaScript / Configuration Files : These files let you configure menus and other options in the app. The files will have comments to help you understand how each variable affects the app.

Language Files : The language files let you change text strings used in the app. We currently support only single language apps. If the language file for your language is not present, let us know via a ticket and we will create a copy of the English language file for you to start translating.


Downloading the Customization Once you have completed the app form and the customization, you can download the zip. Let us know once you completed the process so we will create a build for you